

Have you got a telescope as a present? Or, maybe, you've bought the device just on a whim? Congratulations! You’ve made the right choice.
However, if you are only deciding what model to choose, visit the blog Best Telescopes for Beginners and read our article. You are welcome to contact us for assistance anytime you need.
So, this material is devoted to the first steps in exploring the star world mysteries.
Ready? Let’s start.
To use a telescope is an exciting and fascinating experience. Isn’t it really mesmerizing to watch celestial bodies dwelling in space? Good equipment and sufficient knowledge are excellent helpers in this interesting process.
How to set up a telescope? How to use it? What objects to take for observing? Numerous questions appear in a first-timer's mind. We try to answer them and give you a fine solid base for investigating mysteries of the stellar world.
What to Expect When Using a Telescopic Gear
Frankly speaking, the picture taken through the oculars has less in common with bright illustrations of galaxies, nebulae, constellations, posted in magazines. But wait, there is no room for disappointment! Natural outer-space world is absolutely all-absorbing, we promise.
It does not matter how much your first device cost, be sure, you will come across really amazing sights. Each planet in the depth of the dark sky looks quite magnificent. By using bright stars as reference points and following our recommendations and tips on how to use a telescope correctly, you’ll gain an unforgettable experience.
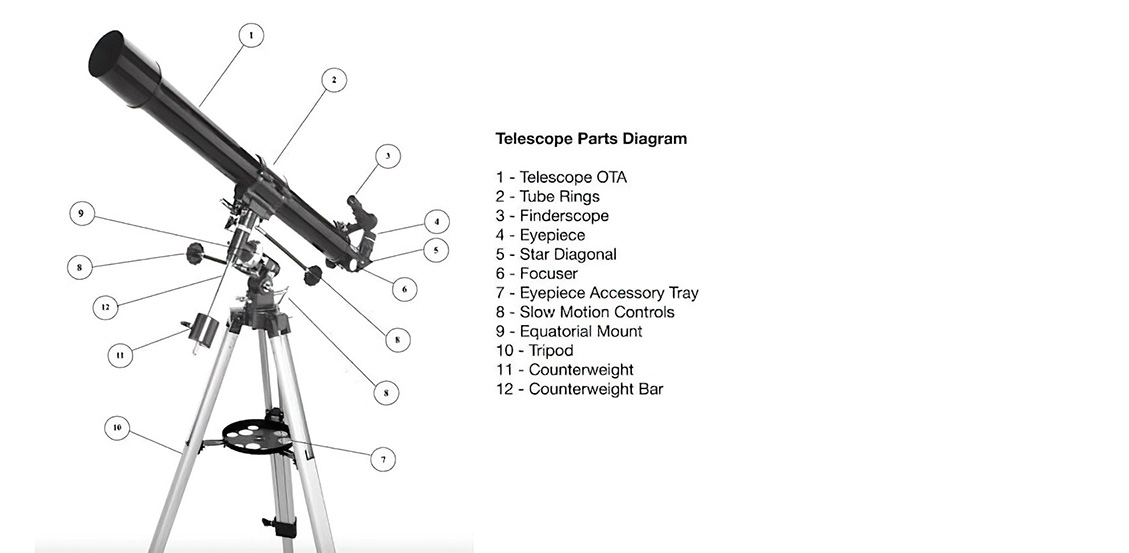
Telescope Parts: a few theoretic notes
Understanding how various elements of the telescopic equipment act is essential for making the most out of stargazing practice. The key details everyone is to study:
- optical tube;
- mount;
- finderscope, crucial for aligning with the main telescope to locate celestial objects effectively;
- telescope eyepieces: essential for magnification and enhancing the viewing experience.
We see, you cannot wait to have a closer look at every issue, can you?
Telescope Optical Tube for Light
The optical tube houses the primary optics responsible for gathering and focusing light. Three telescope types are produced in the astronomical sphere: refractors, reflectors and Cassegrain reflectors. You are welcome to read the article Best Telescopes to see Planets in our blog. There you will find supplementary information.
Telescope Mount for Supporting
Telescope Mount provides stability and lets you track astronomical objects smoothly. The constructors offer two kinds of the issue. An equatorial mount, for instance, eliminates field rotation and aligns with the Earth's rotation axis, making it highly effective for tracking celestial bodies.
Equatorial (EQ)
The way equatorial equipment tracks the sky is an arc. These things are ideal for following objects around the skydome. Numerous configurations are created, ranging from simple manual with one or both axes control items to motorized and computerized ones.
Alt-azimuth (Alt-Az)
Alt-az mounts are simple-to-manage – moving in vertical and horizontal flats – certain to present the customer with a more user-friendly experience. In a word, less ‘intimidating’, if compared with EQ. The counterpoint is that the equatorial mechanism can give you more detailed information devoted to principles of the celestial world.
The setup procedures differ, first of all, define the Mount your gear has. The counterweights are a feature of EQ, while Alt-Az doesn't have it.
Finderscope for Targeting
A finderscope is a minor, secondary telescope or sighting device on a larger main unit. A large vision field is typical to it, assisting in locating objects quickly and accurately.
Two forms are usually offered to a customer:
- Optical Finder (thanks to lenses it magnifies the figure; it possesses a reticle in the centre of the vision field, like a rifle sight).
- Red Dot Finder (the magnification of the item is 1x; it superimposes a dot of red colour on the stellar area).
Each issue has its own advantages. Getting a good item (of any type) is urgent.
Eyepieces for Observing
As a rule, the eyepieces coming in a basic configuration are of low quality, and you probably only get one or two. Choosing appropriate articles can significantly enhance your viewing experience. Opting for higher-quality issues can provide improved clarity, increased magnification, and a broader vision field. In this case, you will observe celestial objects with greater detail and precision.
We recommend buying a set of high-quality eyepieces from reputable brands, Celestron or Tele Vue, for instance, to maximize the pleasure of stargazing. Besides, consider buying a zoom unit, offering adjustable magnification, to the collection.
Counterweights for Balancing
The mentioned elements are for organizing a balance between the telescope and mount system. By adjusting their position on the mount's counterweight shaft, create a proper balance, essential for smooth, accurate tracking of astronomical bodies.
Counterweights ensure that the device's weight is distributed, evenly preventing the mount from becoming too ‘top-heavy’ or unbalanced. The gear being well-balanced, the mount's motors work effectively and track astronomical objects accurately.
Slow Motion Controls or Handset for Tracking
Our Earth is going round the Sun, and a real wonder is the speed objects are moving with. Slow-motion controls are installed for tracking astronomical bodies across the skydome. The computerized mount with a handset usually includes a tracking function to follow them automatically. Many of the issues are App-enabled, allowing even greater ease of use.
How to Assemble the Telescope and Apply it: useful tips
We recommend that the first assembling of the device should take place indoors. Besides, it is much better to practice a bit within the house before organizing an open-air session.
Follow the manufacturer's instructions when setting up your telescope. Every step must be performed. Just remember that instruction booklets can be generic and your device slightly different. If in doubt, ask us! Typically, the process involves settling the mount to the tripod and later placing the optical tube assembly (OTA) onto the mount. After assembling the telescopic gear should be stable and leveled.
Aligning the Finderscope
The telescopic gear usually comes including an optical finder or red dot analogue. Read and watch the guide in order to attach the finder set on your device accurately.
Align the Finderscope with the main optics to locate astronomical miracles initially. To arrange the system well, proceed as described below:
- During daylight hours, guide the gear to a distant, fixed target – a tree, building, etc.
- Look at the viewer and check if the thing is in the vision field. In another case, manage the controllers to catch it in the centre of the ocular. Lock the knobs. Your device is fixed.
- Handle the adjustments on the finder set to centre the targeting object in its vision field.
- Look through the main ocular once more to affirm the central disposition of the matter. Repeat step 2 and 3 if necessary until you receive it centred in both the finderscope and eyepiece.
Now everything is ready.
Setting up the Mount
As said above, study what type of mount your gear has.
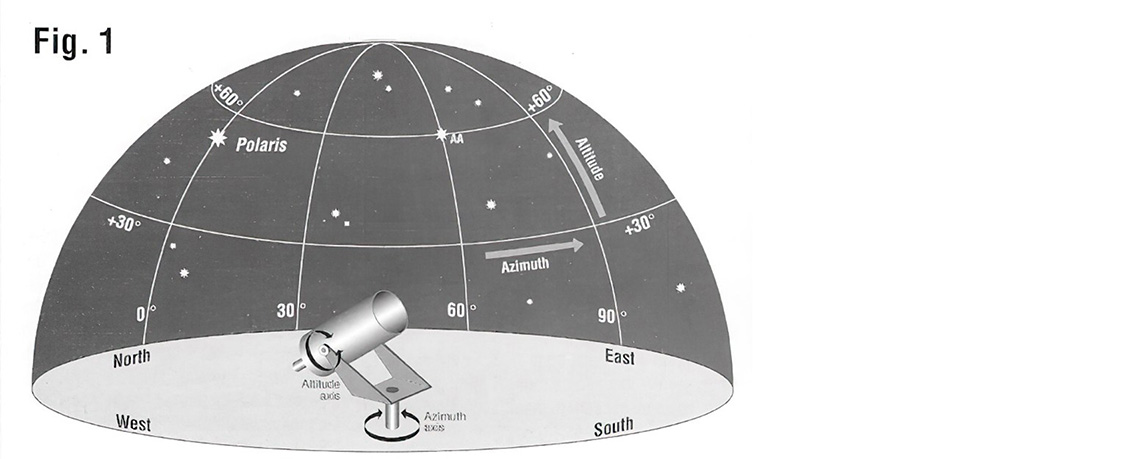
Alt-Az Mounts
Alt-Az Mounts are the simplest, requiring minimal setup. They have two axes perpendicular to each other. The altitude axis enables the device to move from horizontal to vertical positions, while the azimuth axis is for movement in an arc parallel to the skyline, covering a full round of 360 degrees.
To deal with your Altitude-Azimuth mechanism, at first loosen the locks on both the altitude and azimuth axes. Then guide the item to the desired matter and fix them to prevent the device from moving. Manage the slow-motion controls to shift the gear in vertical and horizontal flats, be convinced that the object remains within the vision segment.
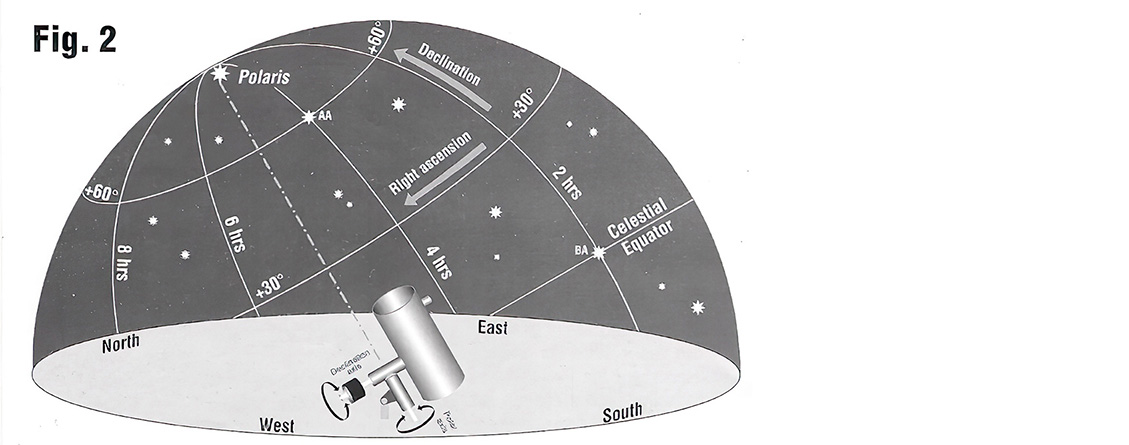
EQ Mounts
Equatorial units employ two axes perpendicular to each other, but one is tilted to align parallel to the Earth’s axis. For astronomers in the Northern Hemisphere, this tilted axis, known as the Polar Axis, will always point close to Polaris, the North Star. This alignment allows the device to track astronomical bodies by simply countering the Earth’s rotation along one motion axis. Once the desired object has been located, the Declination axis can be locked while a motive force (manual or motorized) is applied to the Polar axis for tracking.
In order for the result to be punctual the Polar axis of the mount must be very accurately aligned on the celestial Pole. Pole Star (Polaris) is a basis for this alignment.
Besides, take into consideration Polar Alignment Apps. Both smartphone apps or computer software may be used to assist with the process by providing real-time guidance based on your location and the stellar matters position.
Remember, achieving precise polar alignment may take some practice, but it's essential for correct tracking and astrophotography.
Leveling Your Tripod
Leveling your tripod is an essential step in setting up your telescope. A level tripod ensures that your telescope is stable and secure, which is critical for accurate tracking and observing. To level your tripod, follow these steps:
- Place the tripod on a flat surface and adjust the legs to the desired height.
- Use a bubble level to check if the tripod is level. If it’s not, adjust the legs accordingly.
- Once the tripod is level, tighten the leg locks to secure it in place.
- Finally, check the level again to ensure that the tripod is still level.
A properly leveled tripod provides a solid foundation for your telescope, reducing vibrations and ensuring smooth movement. This is especially important when observing faint deep sky objects, where even slight movements can disrupt your view.
Controlling the Device
GoTo or WiFi enabled Mounts come with either a Hand Controller or an App to manage the telescopic gear. Read through the guiding materials and study how to operate with both systems. Do not consider this process to be dull and irrelevant.
Computerized issues often require inputting the initial data, so make certain of carrying out the setup procedures coherently. Keep a check on:
- date formats (Americans use Month/DATE/Year);
- + and – signs.
Watch if your Computerized Mount allows for manual operation. In some cases redoing of the alignment procedure may be needed. It concerns returning to the GoTo function.
Always be convinced that your tripod is level and conduct polar alignment attentively for optimal performance. By mastering these controlling techniques, everyone can unlock the full potential of the astronomical device and improve celestial observations.
Selecting the Eyepiece
This element plays an important role in observation, as it determines both the magnification and visual field of the stars and planets you explore when operating with the equipment. Understanding how to pick out the right article is essential for optimizing the process of sky watching.
Eyepieces are produced in various focal lengths. These dimensions are always depicted on the oculars. A higher number means lower magnification and vice versa. Dividing the focal length of the whole gear by the ocular one you will work out the magnification digital value.
- Lower focal length issues provide higher magnification, making them suitable for observing objects that require a closer look, for instance, planetary details or lunar features.
- Higher focal length issues offer lower magnification but a wider vision field, making them better suited for capturing expansive celestial objects like stellar clusters and systems.
When starting the observation session, take an issue of a larger focal length number to locate and centre the subject-matter in the vision field easily.
Do not touch the oculars while using the device. Even slight vibrations cause the image shake, disrupting your viewing experience.
Sighting the Telescope
Operate with a finderscope to sight the telescopic unit at a bright body in the sky sphere, may it be a planet or any appropriate star. Centre it in the finder's view. Look through the main ocular and fine-tune its position until this body is centred in the vision area.
Focusing the Telescopic Gear
Adjust the focus knob on the telescopic gear until the object looks sharpest. Slowly adapt the focuser to get used to its features and then back up to the best spot. This may take a little practice, so be patient.
When organizing group sessions, take into account that a refocusing may be necessary as personal vision senses are different.
Changing Magnification
Loosen the fixers keeping the eyepiece in and swap for a higher magnification ocular or a Barlow Lens. Tighten the locks. Refocus the issue if needed unless the optical objects are ‘parfocal’.
Become convinced that this very magnification is suitable for the aperture and the seeing conditions you have. The maximal point is equal to approximately 2x per mm of aperture.
Useful Supplies
A few topical items are certain to improve the process of stargazing. They are not obligatory, but provide extra convenience and pleasure.
- Planisphere, Sky Map, Astronomy Software or an App are quite handy for leading the way around the sky.
- Red Torch – you should allow a few minutes for your sight to become dark adapted. Use red LED lamps to protect your night vision.
- Barlow Lens multiplies the magnification of the ocular by x2 or more – an excellent assistant in enhancing the magnification possibilities of existing oculars.
- Filters will improve specific objects visibility. They are added to the device's eyepieces. Swapping one colour for another you may see different specifics of the observable body.
- Books for a Beginning Astronomer: we advise you to get acquainted with Celestron Observer's Map of the Moon, Turn Left at Orion, The Cambridge Star Atlas and others.
- Telescope Covers come in different sizes for every person to purchase the one suitable for his or her device. The special material reflects the sunlight, protecting your gear from becoming hot. Thanks to it, you may work with your equipment in the daytime and forsake it outside ready for the session.
A star chart is also essential for locating celestial objects, providing detailed maps of the night sky similar to earthly latitude and longitude.
Before Observing Process Starts
Prepare for the observation beforehand. Follow these recommendations to improve its convenience and effectiveness.
How to Find Astronomical Objects?
Define your astronomical targets. To learn what is in the skydome on this very day use such means as:
- Planisphere,
- Sky Map,
- astronomy software like Stellarium (free) or SkySafari (paid).
Remember that a considerable part of sky objects may be observed only in a particular period. So it might be frustrating if not prepared.
How to Choose the Right Location?
Telescopes don’t work pointed through a window from indoors, even if it is open. The air temperature difference will make the air turbulent and ruin your view. Astronomy is an outdoor hobby!
Dark skies with minimal light pollution provide ideal observing. However, this doesn’t stop you from dealing with telescopic equipment in the city. The problem is usually faced by lots of amateur astronomers. Before we relocated from London we arranged the set in Regents Park!
You will always get a more exciting experience from a darker location, but even the city centre lets you enjoy stargazing much. Modern equipment allows it, and a light-pollution filter can improve the situation if needed.
In your workplace try to get the most suitable observing space:
- A level or almost level spot (not a decking as it may vibrate while you're walking).
- Choose grass, if possible. Concrete might be generating heat for a while if the weather is warm enough that day. It will result in distorting the air and the image as well.
- Far from obstructions like tall buildings or trees.
- Far from the lights to the greatest possible extent.
- The locus should provide a widely open sky space. The perfect position is South.
The astronomical gear may take some period to adjust to the temperature, so assemble it outdoors before the darkness comes. When the sun sets, everything will be ready.
Browse the Weather Conditions
To keep a wary eye on observing conditions is essential for an effective stargazing session. Factors like cloud cover and atmospheric stability can significantly impact your ability to watch astronomical objects clearly. Consider using apps or websites that provide real-time sky conditions to help in planning your gazing nights nicely.
Prepare the Accessories
Be convinced that your Accessories are ready for the process. It is more effective to bring the items out at once than to keep going back. A good idea to organize every matter is an Accessory Bag.
Dealing with Dew and Moisture
Dew and moisture can be a major problem for telescope users, especially in humid or coastal areas. Here are some tips for dealing with dew and moisture:
- Use a dew shield or dew heater to prevent dew from forming on the telescope optics. Dew shields are simple, tube-like extensions that fit over the front of the telescope tube, while dew heaters are electric devices that keep the optics warm.
- Keep the telescope in a dry, well-ventilated area to reduce the risk of moisture buildup. When not in use, store your telescope in a case or cover it with a protective cover.
- Use a desiccant or silica gel to absorb moisture from the air. Place these in your telescope case or storage area to keep the environment dry.
- Avoid observing in humid or foggy conditions, as this can cause moisture to accumulate on the telescope optics. If you must observe in such conditions, take frequent breaks to wipe down the optics with a clean, dry cloth.
- Regularly clean and maintain the telescope optics to prevent moisture buildup and ensure optimal performance. Use a soft brush or air blower to remove dust, and clean the lenses with a lens cleaning solution and microfiber cloth.
By taking these precautions, you can protect your telescope optics from moisture and enjoy clear, crisp views of the night sky.
Exploring the Night Sky: First Targets to See
Once you've successfully located and focused on one nonterrestrial object, you can start exploring other celestials like planets, star clusters, and whatnot.
Using bright stars as reference points can significantly improve your accuracy in locating these objects. Both star charts and mobile apps can assist you in identifying astronomical bodies. Identifying deep sky objects is crucial for a comprehensive stargazing experience. The Orion Nebula is a notable deep sky object that is particularly fascinating to observe.
The Moon: the best start ever
Being the largest and brightest issue observed in darkness, it gives a good chance of locating and studying telescope controls and supplies. A first-timer’s gear will demonstrate stunning sights of its surface structures. Constantly changing shadows and details along the satellite surface will occur in the vision field as well.
Begin with the ocular of the longest focal length existing in your collection, as a lower magnification is desired for revealing more of the target object. Keep an eye on the transition between light and dark spots – the ‘terminator’ – you’ll be stunned at possible discoverings.
Next, use a shorter focal length ocular to observe finer surface details. Take a Moon Map to navigate the path around the astronomical body.
The planet beauty of the Venus, Mars, Jupiter and Saturn
After the natural Earth satellite, continue studies with the brightest near-hand Planets. They are not always well-placed, but if being, they remain visible for months at a time.
Jupiter will show its cloud belts and even an amateur device can show its four largest moons (Io, Europa, Ganymede, and Callisto) as they orbit the planet.
All but the smallest of simple telescopes will reveal the stunning rings of Saturn and its largest moon Titan. Generally, 40-50x magnification is required to make out the ring system. Larger telescopes will show more detail and more moons of Saturn.
Mars is at its closest to Earth approximately every two years. This happens next in January 2025. Sign up for our Newsletter for regular ‘what’s in the sky’ updates.
The brightest planet, Venus, will exhibit its phases and show a large crescent when being close to the Earth.
The stellar greatness of Galaxies, Nebulae and Star Clusters
After observing a few large targets and mastering the telescope controls, it is high time for going to greater objects. Begin a new journey with the constellations. They may be found at night all year round. It is just your locating conditions that let you find these or those astronomical bodies. On the territory of the UK, Orion, Ursa Major, Cassiopeia, and Draco may be observed.
Learning these key elements is fundamental for effective navigation through the sky dome. Once you have pinpointed their locus you can identify seasonal constellations, binary and double stars. The most beautiful spectacular objects are waiting for you at the Messier catalogue.
- Galaxies, vast collections of stars, gas, and dust, come in different shapes and sizes, from spiral galaxies like Andromeda to irregular ones like the Magellanic Clouds.
- Nebulae are clouds of interstellar gas and dust, a birthplace for new stars. Among the most iconic we may mention the Orion, the Crab, and the Eagle Nebula, each displaying unique structures and colours to mesmerize observers.
- Star clusters, on the other hand, are tightly-knit gatherings of stars that share a common origin. Open clusters, like the Pleiades, are scattered groups of young stars born from the same molecular cloud, while globular clusters, such as M13 in Hercules, are densely packed spheres containing a bazillion of ancient stars.
Astrography as a Separate Hobby
Astrography, or astronomical imaging, is an exciting and mind-blowing hobby as well, intimately related to using the telescope. The range of objects varies from celestial bodies to areas and events. Astrophotographers are usually amateurs, seeking for aesthetic enjoyment rather than scientific investigation.
One of the requirements for taking such pictures is long exposure. We need much time, hours to be precise, for capturing enough star light to create a successful photo. Another problem here is that stellar objects are constantly moving from east to west, so the gear must be pointing at the exact body (fix data) all the time. That's why telescopic equipment with good tracking is much needed.
It is advisable to have an Alt-Az mount for this purpose, as it is much simpler in adjustment, not requiring manual polar alignment. To solve the problem with field rotation, keep the target object in the centre of the picture, where a full exposure is.
Widely-spread techniques in astrophotography are:
- light graphic;
- time-lapse;
- starscapes; and
- close-ups.
When becoming professional in dealing with telescopes, try astrophotography. It is really captivating and challenging, in a good sense, of course.
Safety Precautions
Never attempt to watch the Sun straight forward through the oculars. Such a direct viewing can result in severe and permanent eye damage. We stock a fine assortment of safe solar filters, and invite you to select a fine item for your device.
Be attentive with all the equipment. Do not drop filters, oculars, technical details, mechanisms, accessories and other stuff. It should be kept in a reliable place, testifying to technical and safety requirements. If you leave the gear outside all day long, use a special heat reflecting cover.
One more thing to take into consideration is convenient and weather-suited clothes. It may get quite cold during nighttime observation sessions. Dressing with layered garment and bringing along insulated outerwear, such as jackets or coats, will help keep you comfortable and focused on enjoying the celestial sights without distraction.
Finally
To cap it all, we'd like to make an accent on the order of your actions to prepare for successful stargazing.
- To get a telescopic gear (identify its type and technical abilities, take into account your living and observing conditions, and desired target behavior as well).
- To study the ways of operating with the equipment (learn its every element: a mount, tripod, finderscope and others).
- Organize an observing session (examine the sky, choose amazing targeting objects, get enough practice for further topical group meetings).
After learning all the aspects mentioned above, you will start a great astronomical tour! We wish you good luck in celestial experience. Becoming a professional telescope user takes time and effort. Be patient and continue experimenting to improve your skills in locating and observing stellar objects. Managing telescopic equipment can be a deeply rewarding hobby, letting you explore the miracles of the deep dark sky and unlock Universe secrets. Have Wonderful Stargazing!
Do you need our help? Or, maybe, ready to continue your stellar journey? We are here to support any astronomical idea you have.
Then call us on 01353776199 or email sales@widescreen-centre.co.uk for more advice. We are happy to help!
Clear skies!
Simon, Elena and The Widescreen Centre Team